
Let’s dive right in! In the previous post (part I) we set up the context for this blog. Basically, as we introduce a strategy to bring microservices to our architecture, we cannot and should not disrupt the current request flows. Our “monolith” applications typically provide a lot of value for the business and we must drive down the risk of negatively impacting these systems as we iterate and expand. This leads us to a often-overlooked fact: when we start to explore a monolith to microservice journey we’re going to quickly run into the undesirable, sometimes nasty parts that we cannot just wish away. I encourage you to go back and read the first part if you haven’t yet. Also go read the part about when NOT do microservices.
Follow along (@christianposta) on twitter or http://blog.christianposta.com for the latest updates and discussion.
You can find Part I and Part III.
From the previous part, here are some of the considerations we want to solve:
- We need a reliable and consistent way to build our services. We need a continuous delivery system.
- We need a way to test our services/monolith/etc
- We need a way to safely bring any changes into production including dark launches, canaries, etc
- We would like a way to route traffic to our new changes, or enable changes (or kill switch) any new features/changes
- We will be dealing with lots of nasty data integration challenges
Technologies
The technologies we’ll use to help guide us on this journey:
- Developer service frameworks (Spring Boot, WildFly, WildFly Swarm)
- API Design (APICur.io)
- Data frameworks (Spring Boot Teiid, Debezium.io)
- Integration tools (Apache Camel)
- Service mesh (Istio Service Mesh)
- Database migration tools (Liquibase)
- Dark launch / feature flag framework (FF4J)
- Deployment / CI-CD platform (Kubernetes / OpenShift)
- Kubernetes developer tools (Fabric8.io)
- Testing tools (Arquillian, Pact/Arquillian Algeron, Hoverfly, Spring-Boot Test, RestAssured, Arquillian Cube)
If you’d like to follow along, the sample project I’m using is based on the TicketMonster tutorial on http://developers.redhat.com but has been modified to show the evolution from monolith to microservice. You can find the code and documentation (docs still in progress!) here on github: https://github.com/ticket-monster-msa/monolith
Let’s go step by step through Part I and see how we can address each step. We’ll also bring in the considerations from the last blog and revisit them in this context.
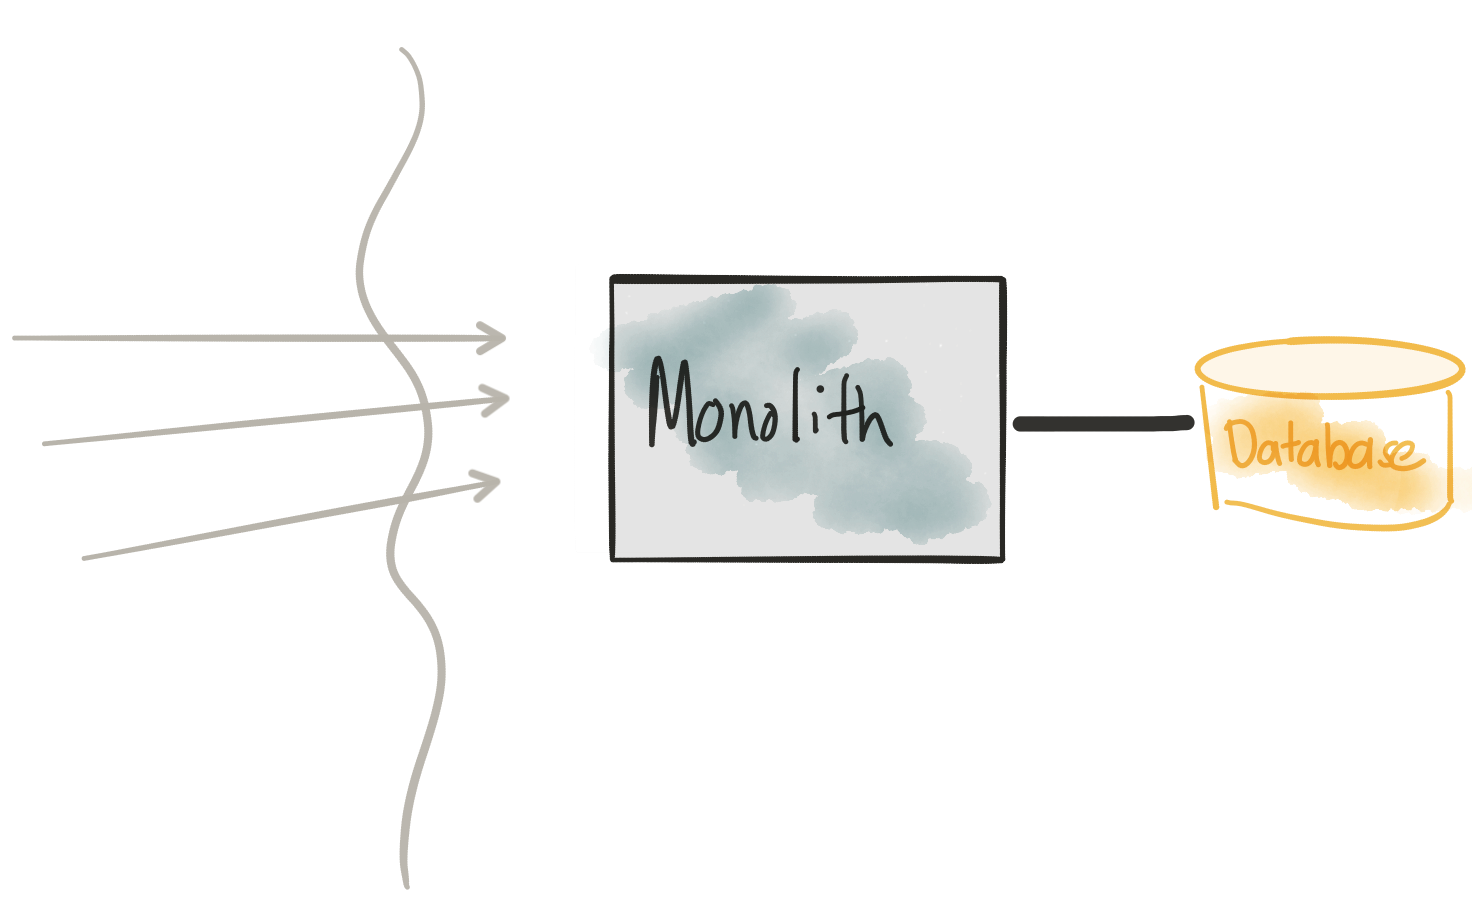
Meet the monolith
Revisit Considerations
- Monolith (code and database schema) is hard to change
- Changes require complete re-deployment and high coordination between teams
- We need to have lots of tests in place to catch regressions
- We need a fully automated way to deploy
This may not always be possible, but if you can, write lots of tests for your monolith. As we start to evolve the monolith, either by adding new functionality, or replacing existing functionality, we need a good understanding of the impact of our changes. In his book about Refactoring Legacy Code, Michael Feathers defines “legacy code” as not having tests in place. Using tools like JUnit and Arquillian help tremendously. You can be as fine grain or coarse grain as you like with Arquillian and package up your application however you need (with proper mocks, etc) to exercise the part of the application you intend to test. For example, in our monolith (TicketMonster), we can define a micro-deployment that stubs out the database for an in-memory one and also pre-loads the database with sample data. Arquillian works well for Spring Boot applications, Java EE, etc. In this case, we’re testing a Java EE monolith:
public static WebArchive deployment() {
  return ShrinkWrap
    .create(WebArchive.class, "test.war")
    .addPackage(Resources.class.getPackage())
    .addAsResource("META-INF/test-persistence.xml", "META-INF/persistence.xml")
    .addAsResource("import.sql")
    .addAsWebInfResource(EmptyAsset.INSTANCE, "beans.xml")
    // Deploy our test datasource
    .addAsWebInfResource("test-ds.xml");
}
Even more interesting, you can run your tests embedded in the runtime to verify all the components work internally. For example, in one of the above tests, we can just inject the BookingService into our tests and run it directly:
@RunWith(Arquillian.class)
public class BookingServiceTest {

    @Deployment
    public static WebArchive deployment() {
        return RESTDeployment.deployment();
    }

    @Inject
    private BookingService bookingService;

    @Inject
    private ShowService showService;

    @Test
    @InSequence(1)
    public void testCreateBookings() {
        BookingRequest br = createBookingRequest(1l, 0, new int[]{4, 1}, new int[]{1,1}, new int[]{3,1});
        bookingService.createBooking(br);

        BookingRequest br2 = createBookingRequest(2l, 1, new int[]{6,1}, new int[]{8,2}, new int[]{10,2});
        bookingService.createBooking(br2);

        BookingRequest br3 = createBookingRequest(3l, 0, new int[]{4,1}, new int[]{2,1});
        bookingService.createBooking(br3);
    }
For a complete example, take a look at the BookingServiceTest from the TicketMonster monolith module.
But what about deployments?
Kubernetes has become the de-facto deployment platform for containerized services/applications. Kubernetes handles things like health checking, scaling, restarts, load balancing, etc. For Java developers, we can even using tooling like fabric8-maven-plugin to automatically build our container/docker images and generate any deployment resource files. OpenShift is RedHat’s productized version of Kubernetes that adds, among other things, developer capabilities including things like CI/CD pipelines.
Kubernetes/OpenShift is a deployment platform for your apps/services regardless of whether they’re microservices, monoliths, or whatever else in between (with the ability to handle persistent work loads, ie databases, etc). With Arquillian, containers, and OpenShift pipelines, we have a solid way to continuously deliver changes into production. BTW… checkout openshift.io that takes the developer experience even farther with automatic CI/CD pipelines, SCM integration, Eclipse Che developer workspaces, library scanning, etc.
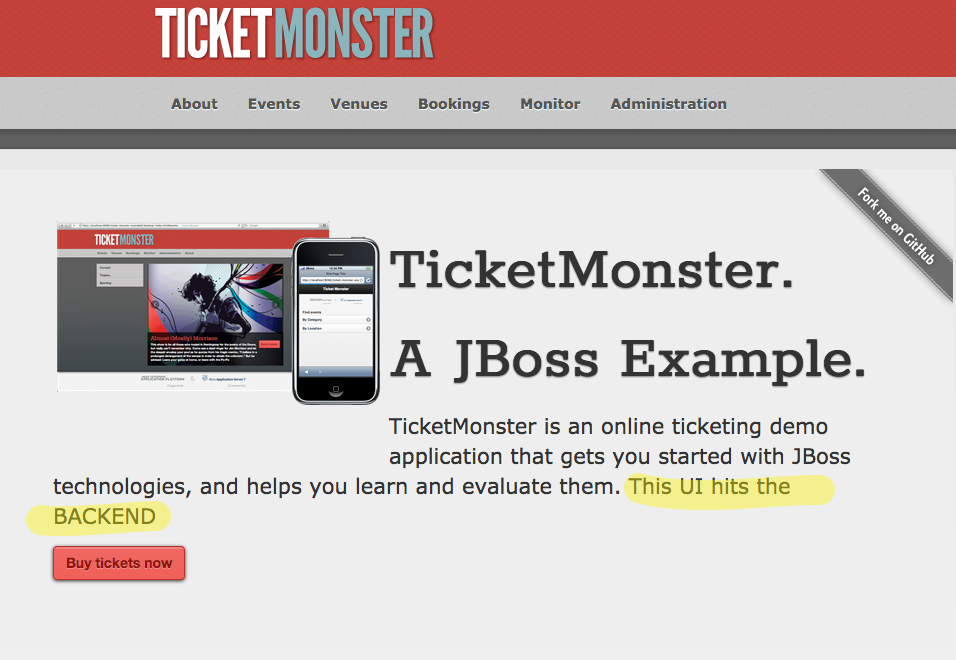
At this point production load is directed at the monolith. If we go to it’s main page, we see something like this:

Let’s start making some changes…
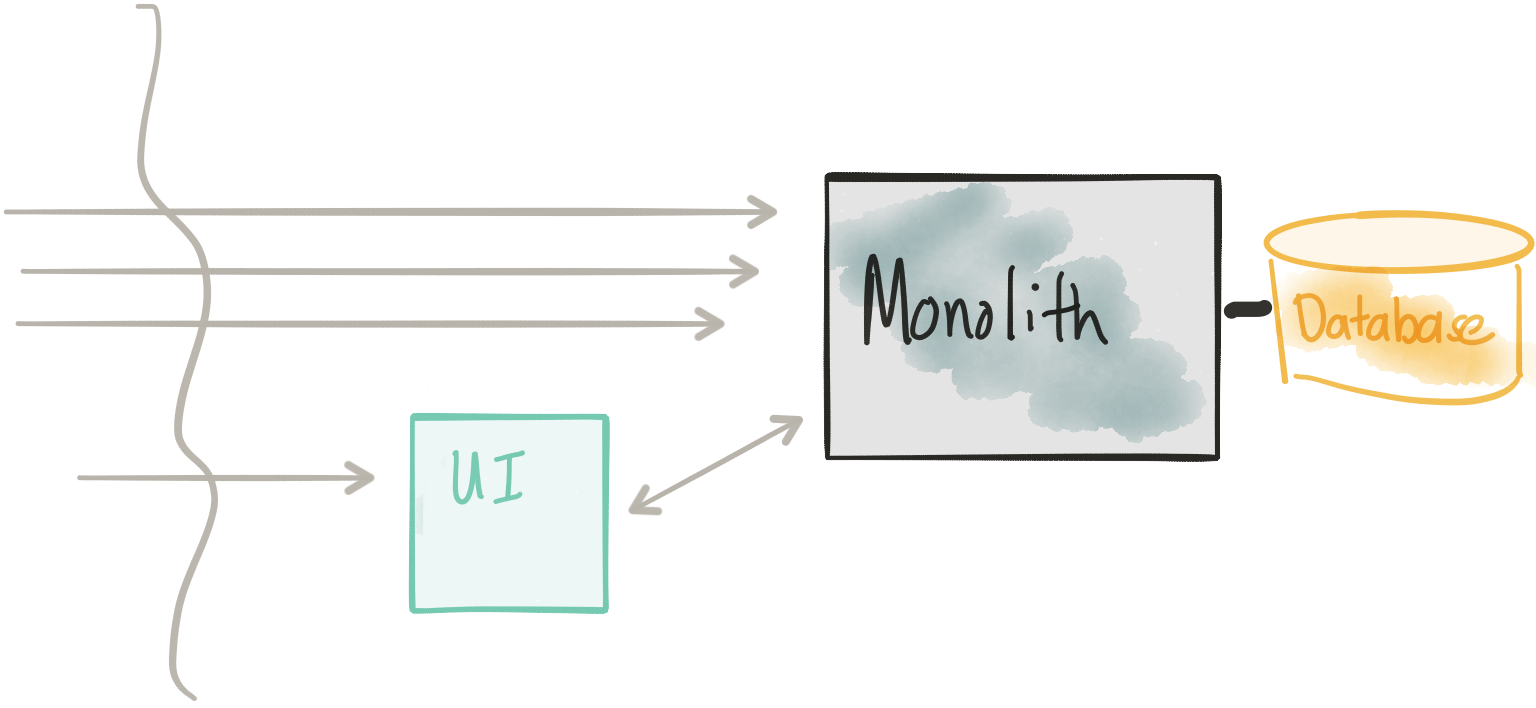
Extract the UI
Revisit Considerations
- Don’t modify the monolith for this first step; just copy/past UI into separate component
- We need to have a reasonable remoting API between the UI and monolith – this may not always be the case
- Security surface increases
- We need a way to route/split traffic in a controlled manner to the new UI and/or the monolith directly to support dark launch/canary/rolling release
If we take a look at the TicketMonster UI v1 code we can see that it’s very simple. We’ve moved the static HTML/JS/CSS components out to its own web server and packaged it into a container. This way we can deploy it separately from the monolith and make changes/version it independently. This UI project will still need to talk with the Monolith to perform its functions, so part of this evolution should be to expose a REST interface that the UI can interact with. With some monoliths this may be easier said than done. If you’re running into challenges with wrapping a nice REST API around the legacy monolith code, I highly recommend taking a look at Apache Camel particularly its REST DSL.
An interesting part about this step is we don’t actually change anything in the monolith. That code stays as is but our new UI gets deployed as well. If we look in Kubernetes, we’ll see two separate Deployment objects and two separate pods: one for the monolith and one for the UI.
ceposta@postamac$ kubectl get deploy
NAME             DESIRED   CURRENT   UP-TO-DATE   AVAILABLE   AGE
mysql-backend    1         1         1            1           4d
ticket-monster   1         1         1            1           4d
tm-ui-v1         1         1         1            1           4d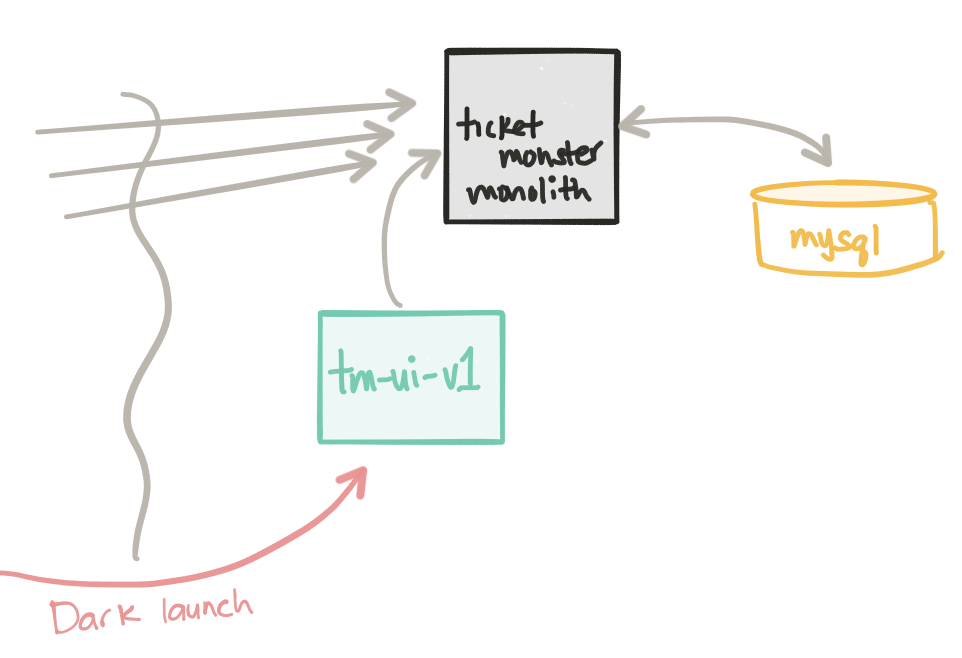
Even though we’ve deployed the tm-ui-v1 UI, we are not seeing any traffic go to this new TicketMonster UI component. For simplicity sake, even though this deployment is not taking production traffic (while the ticket-monster monolith currently takes full production traffic) we can still treat this as a simple dark launch. If we port forward to the UI we can still reach it:
kubectl port-forward tm-ui-v1-3105082891-gh31x 8080:80
We use the kubectl cli tools to port forward from our local box to a specific pod (tm-ui-v1-3105082891-gh31x on its port 80 and map that to our local port 8080. Now if we navigate to http://localhost:8080 we should get to the new version of our UI (note the highlighted text indicating this is a different UI but that it points directly to the monolith)
If we’re satisfied with this new version, we can start directing traffic to this new release. To do this, we’re going to use Istio service mesh. Istio is a control plane for managing a mesh made up of ingress points and service proxies. I’ve written a bit about service mesh and data planes like Envoy. I highly recommend taking a look at its full capabilities. We’ll be iterating over this project as we go through the next few sections to explore Istio capabilities. If you’re further confused about the control plane / data plane distinction take a look at a blog written by Matt Klein which addresses that
We’re going to start by making use of the Istio Ingress Controller. This component allows you to control traffic into the Kubernetes cluster using the Kubernetes Ingress specification. Once we have installed Istio, we can create an Ingress resource like this, pointing traffic to the Ticket Monster UI’s Kubernetes service, tm-ui:
apiVersion: extensions/v1beta1
kind: Ingress
metadata:
  name: tm-gateway
  annotations:
    kubernetes.io/ingress.class: "istio"
spec:
  backend:
    serviceName: tm-ui
    servicePort: 80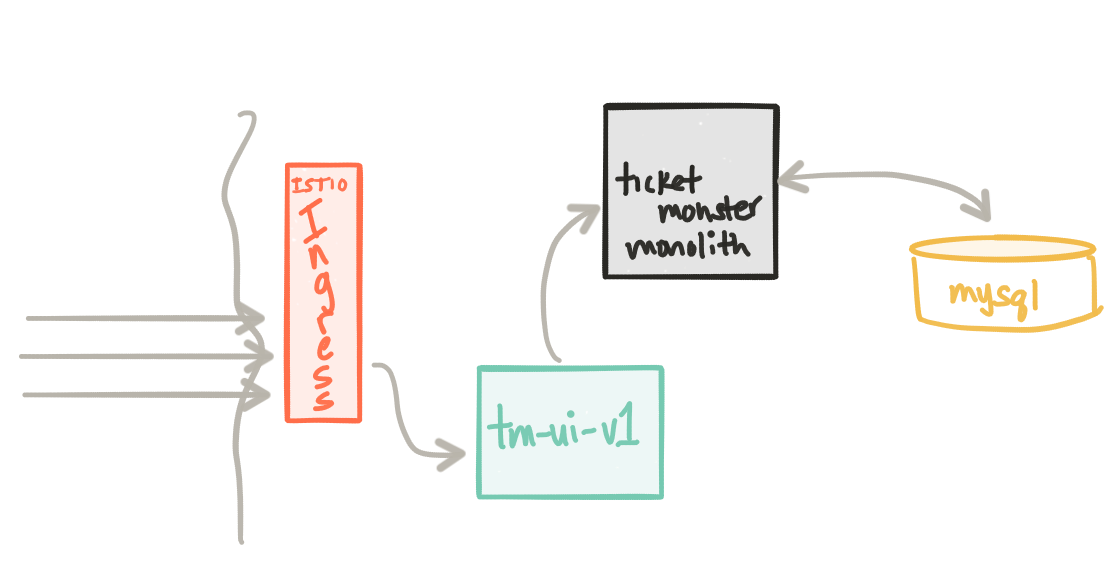
Once we have the ingress in place, we can start applying Istio routing rules. For example, here is a route rule that says “Anytime someone tries to talk to tm-ui service running in Kubernetes, direct them to v1 of the service”:
apiVersion: config.istio.io/v1alpha2
kind: RouteRule
metadata:
  name: tm-ui-default
spec:
  destination:
    name: tm-ui
  precedence: 1
  route:
  - labels:
      version: v1
This will allow us to more finely control traffic into and even inside the cluster. More on that in a bit. At the end of this step, we have all traffic going to tm-ui-v1 deployment which in turn talks to the monolith directly.
Drop the UI from the monolith
Revisit Considerations
- We are removing the UI component from the monolith
- This requires (hopefully) minimal changes to the monolith (deprecating/removing/disabling the UI, possible updates to the REST API)
- Again we use a controlled routing/shaping approach to introduce this change without downtime
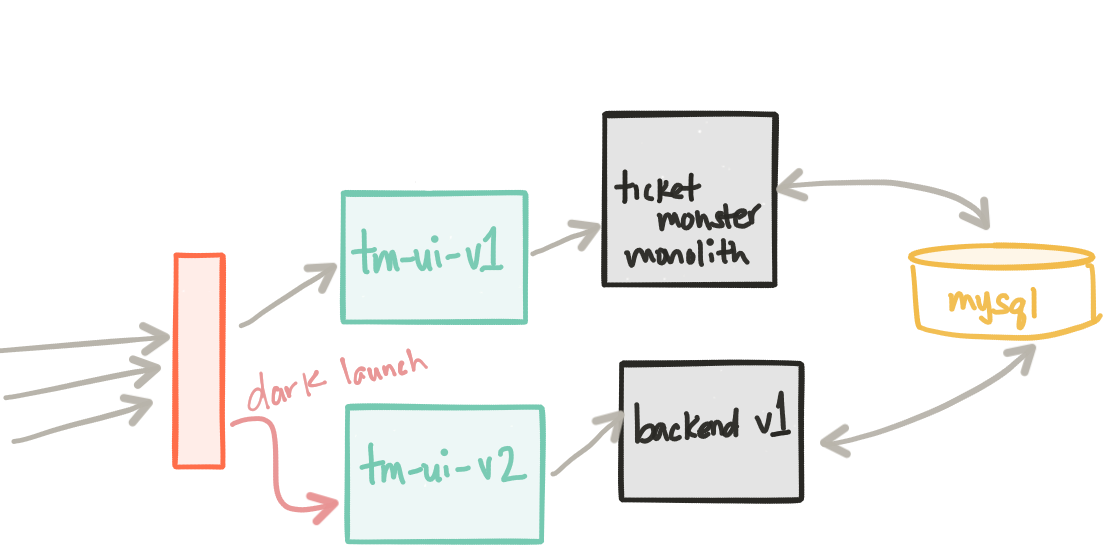
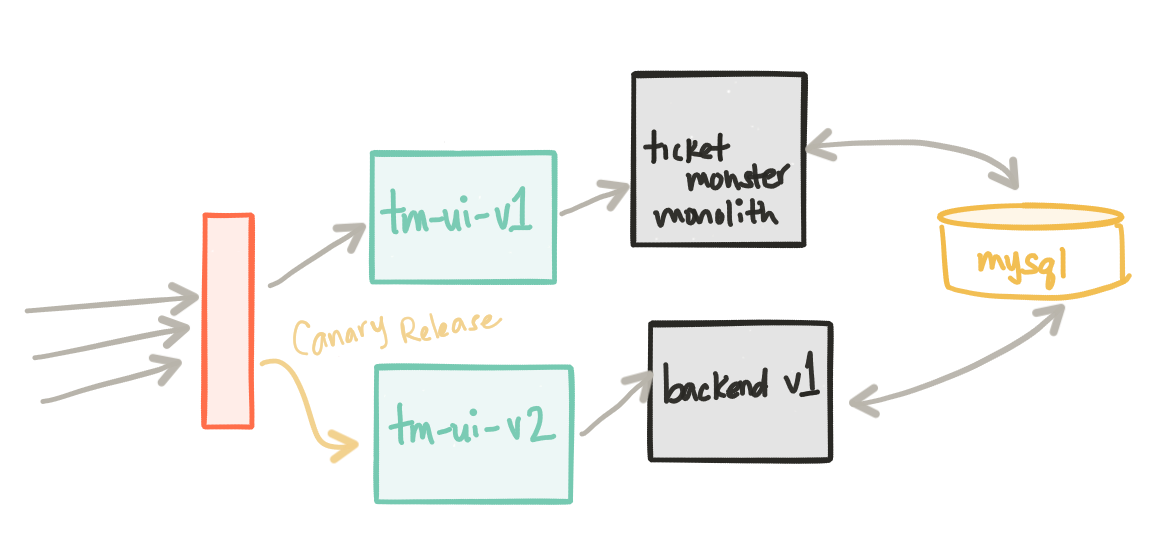
This step is fairly straight forward. We are updating the monolith by removing the static UI components from it (these have now moved to the tm-ui-v1 deployment). We may also make some API changes to this deployment as we’ve now freed the application to become a monolith service with an API that the UI can use and possibly other applications. Since we may make some changes to the API, we may also want to deploy a new version of our UI. In this step we have a deployment of our backend-v1 service as well as a new UI tm-ui-v2 that takes advantage of this new API in our backend service.
Let’s see what’s deployed in our Kubernetes cluster:
NAME             DESIRED   CURRENT   UP-TO-DATE   AVAILABLE   AGE
backend-v1       1         1         1            1           4d
mysql-backend    1         1         1            1           4d
ticket-monster   1         1         1            1           4d
tm-ui-v1         1         1         1            1           4d
tm-ui-v2         1         1         1            1           4d
At this point ticket-monster and the tm-ui-v1 deployments are taking live load. The backend-v1 and the UI that points to it, tm-ui-v2 take no load. One thing to note, the backend-v1 deployment shares the same database as the ticket-monster deployment since it’s nearly identical, but has a slightly different outward facing API.
Our new backend-v1 and tm-ui-v2 components have been deployed to production. This is a good time to focus on a simple, but crucial, fact here: we’ve deployed our changes to production, but we’ve not released them to anyone. The great folks at turbinelabs.io have a great blog that articulates this in more detail. We have an opportunity to do an informal dark launch. Maybe we want to unroll this deployment slowly to our internal users first or maybe to a subset of users in a particular region on a particular device, etc.
Since we now have Istio in place, let’s see what it can do for us. We want to do a dark launch for internal users only. Those internal users can be identified however we like (headers, IP, etc) but for this example, we’ll say any request with an HTTP header of x-dark-launch: v2 will be routed to our new backend-v1 and tm-ui-v2 service. Here’s what the istio route rule looks like:
apiVersion: config.istio.io/v1alpha2
kind: RouteRule
metadata:
  name: tm-ui-v2-dark-launch
spec:
  destination:
    name: tm-ui
  precedence: 10
  match:
    request:
      headers:
        x-dark-launch:
          exact: "v2"
  route:
  - labels:
      version: v2
When we hit our main page as any user, we should see the current deployment (tm-ui-v1 talking to ticket-monster monolith):
Now, if we alter the headers in our browser (for example using Firefox’s Modify Headers tool or something similar), we should be routed to our dark-launched set of services (tm-ui-v2 talking to backend-v1):
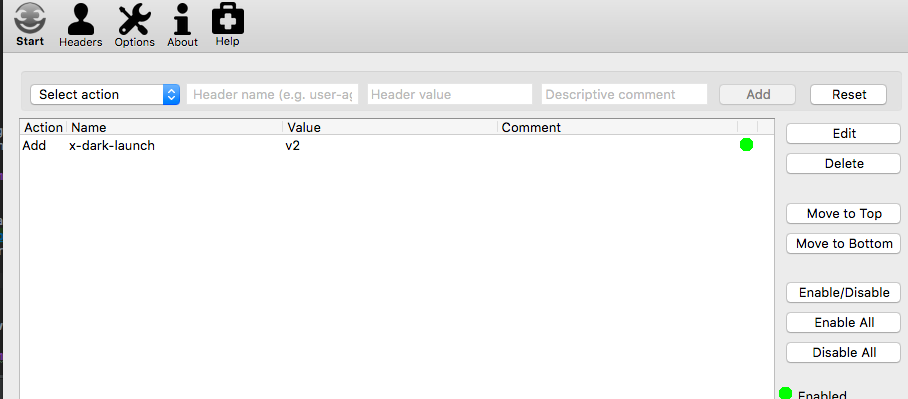
Then click “Start” to start the header modification and refresh the page:
We see we’ve now been redirected to the dark launch of our services. From here we can begin a release to our customer base by doing a canary release (maybe we do 1% of live traffic to our new deployment) and slowly increasing the traffic load (5%, 10%, 50%, etc) if we see there are no adverse effects. Here’s an example of an Istio route rule that canaries the v2 traffic at 1%:
apiVersion: config.istio.io/v1alpha2
kind: RouteRule
metadata:
  name: tm-ui-v2-1pct-canary
spec:
  destination:
    name: tm-ui
  precedence: 20
  route:
  - labels:
      version: v1
    weight: 99
  - labels:
      version: v2
    weight: 1
Being able to “see” or “observe” the effects of this release is crucial and we’ll talk a bit more about that later on. Also note, this canary release approach is currently being done at the edge of our architecture, but inter-service communication/interaction can be controlled with istio for canaries as well. In the next few steps, we’ll start to see that.
Introduce a new service
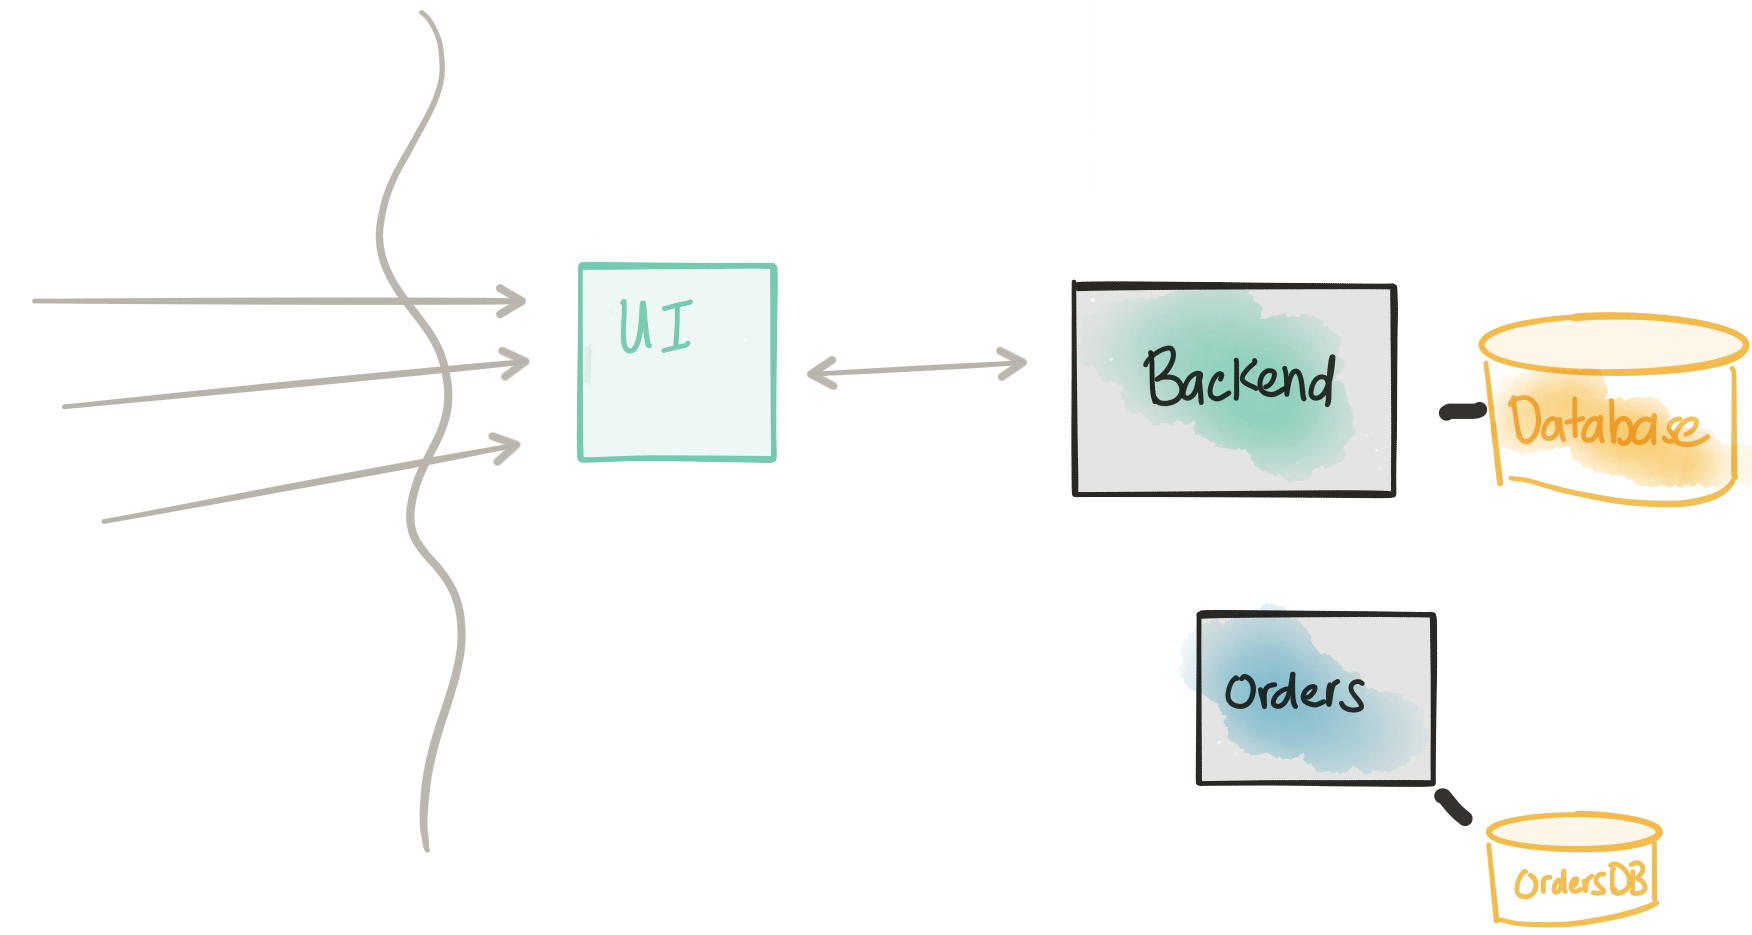
Revisit Considerations
- We want to focus on the API design / boundary of our extracted service
- This may be a re-write from what exists in the monolith
- Once we have the API decided, we will implement a simple scaffolding/place holder for the service
- The new Orders service will have its own database
- The new Orders service WILL NOT be taking any kind of traffic at this point
In this step, we are starting to design the API we want for the new Orders service and this will likely align more to the boundaries we determine through some domain-driven design exercises. Instead of putting in massive effort to build an API up front only to find later that it needs to be constantly changed, we can use API modeling tools to design an API, deploy a virtualized implementation of it, and iterate on it with our consumers.
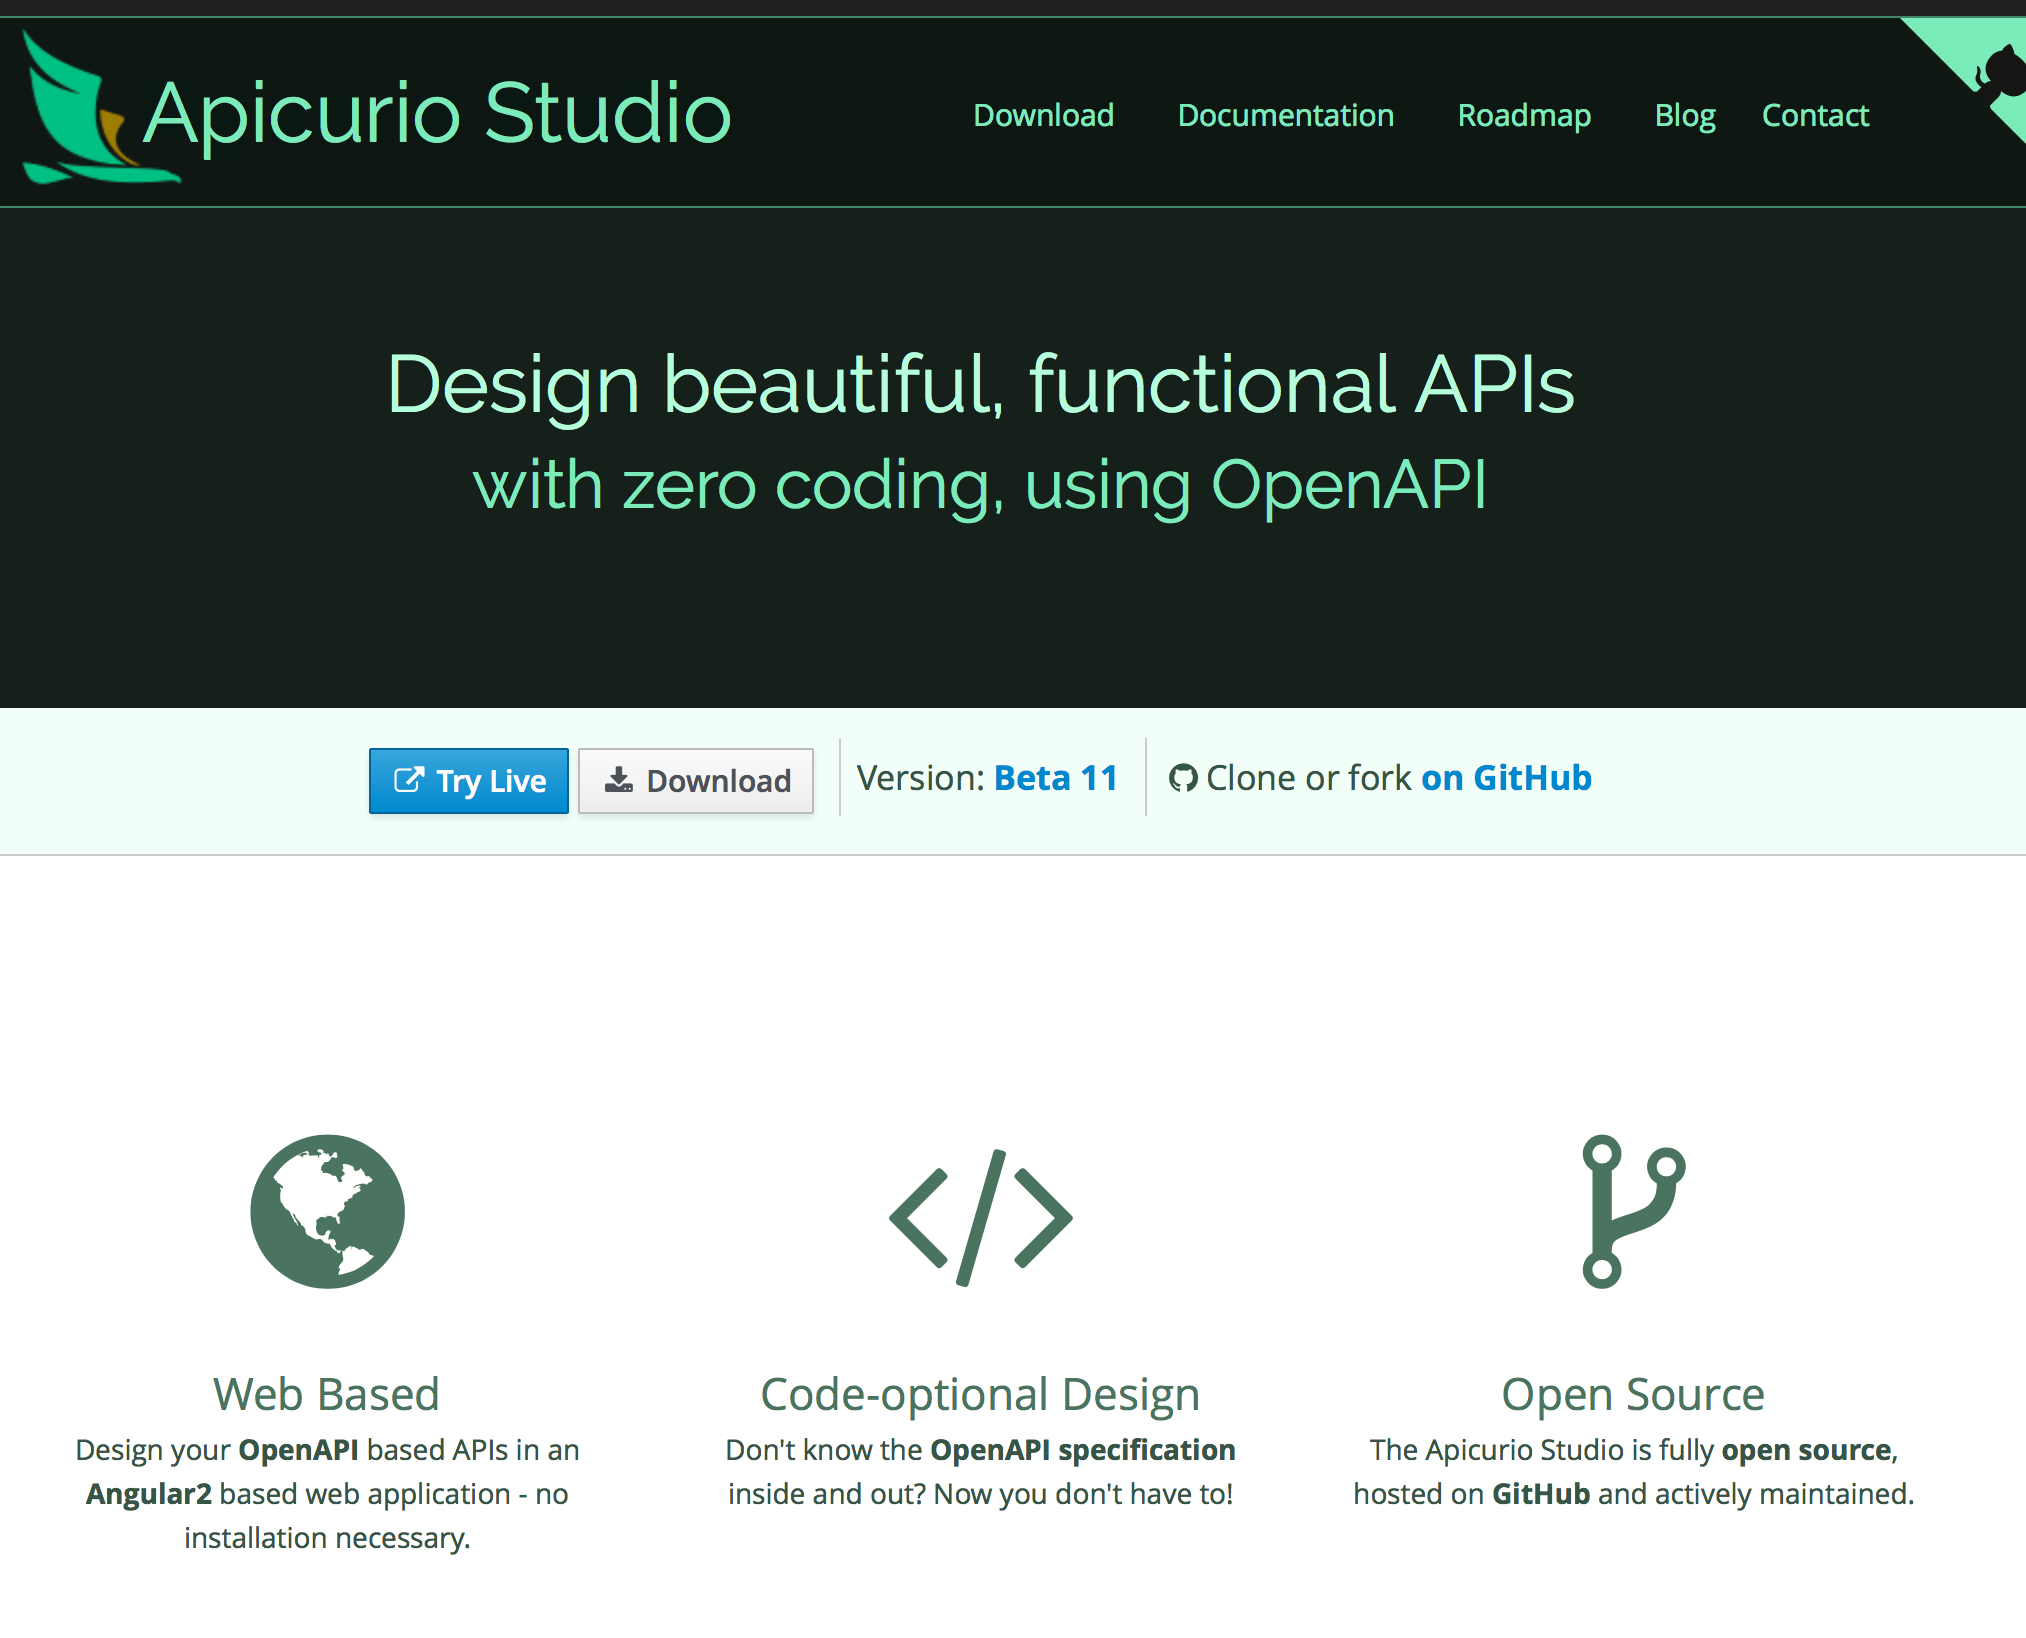
In the case of our TicketMonster refactoring, we may want to keep a similar API to what we have in the monolith to make the decomposition initially as painless and low-risk as possible. In either case, we can leverage two awesome tools to help us: a web-based API designer called apicur.io and a testing/API virtualization tool called Hoverfly. Hoverlfy is a great tool for simulating APIs or capturing existing API traffic so it can be used to simulate a mock endpoint.
If we’re building a greenfield API, or trying to imagine what our API looks like after iterating using a domain-driven design approach, we can use apicur.io tooling to build a Swagger/Open API spec.
In the case of TicketMonster, We used hoverfly to capture traffic from our application to our backend services by starting hoverfly in proxy mode and capturing the traffic. We can easily set an HTTP proxy in our browser settings to send all traffic through hoverfly. This stores the simulation of each request/response pair in a JSON file. From here we use the request/response pairs in a mock or even better, use them to start writing tests that codify behavior we want in our implementation.
For the request/response pairs we care about, we can create a JSON schema (check out https://jsonschema.net/#/editor and use this in our test.
For example, using a combination of Rest Assured and Hoverfly, we can invoke our hoverfly mock and assert that the responses conform to our expected JSON schema:
@Test
public void testRestEventsSimulation(){
    get("/rest/events").then().assertThat().body(matchesJsonSchemaInClasspath("json-schema/rest-events.json"));
}
Checkout the HoverflyTest.java tests from the new Orders service.
For more information on testing Java microservices, checkout this awesome book from Manning called “Testing Java Microservices” from some of my colleagues Alex Soto Bueno, Jason Porter and Andy Gumbrecht.
As this blog post is already getting very long, I’ve decided to split out the last parts to Part III which deals with managing data between the monolith and microservice, consumer contract testing, and how to do feature flagging / more complex istio routing, etc. Part IV of this series will show a recorded demo of all of this in action complete with load simulation tests and fault injections. Stay tuned and follow along on twitter!