
Creating MCP Servers to connect functionality to LLM applications / AI agents is fairly straight forward. Most of the examples you see, however, are the simple stdio-transport MCP servers. If you wish to build MCP shared services that are exposed to applications in the enterprise, they MUST be secured. The MCP community has been iterating on a specification for Authorization, and in its recent release (ie, June 18, 2025) we have an updated Authorization spec that fixes a lot of the challenges of the previous spec.
In this series of blog posts (three parts + source code), we’ll walk “step-by-step” through the latest MCP Authorization spec and implement it. I have made all of the source code for each of the steps available on GitHub.
- Part 1: (This) Implement a spec compliant remote MCP server with HTTP Transport
- Part 2: Layer in Authorization specification with OAuth 2.1
- Part 3: Bring in a production Identity Provider (Keycloak)
Follow (@christianposta or /in/ceposta) for the next parts.
Pre-requisite to MCP Authorization: Use MCP HTTP Transport
To use the Authorization spec, you will need to be using the HTTP transport for MCP. So before we dig too deeply into the Authorization spec, we will need to build an MCP server and serve it over HTTP. If you already have an HTTP based MCP server, you can skip directly to part two where we apply authorization.
Building an MCP server with the HTTP Transport
The HTTP transport for the MCP specification uses a single GET/POST endpoint (ie, /mcp) with optional streamable responses (ie, based on Server Sent Events - SSE). For simplicity, our HTTP server will not support SSE, but we will end with how it can easily be added. Let’s build this server to support the Authorization specification one step at a time.
Step 1: Bootstrap the FastAPI HTTP server
Follow along with the source code for this step.
We will follow the HTTP Transport spec and start by implementing the security warning:
Servers MUST validate the Origin header on all incoming connections to prevent DNS rebinding attacks
Using Python FastAPI We can do something like this:
# Step 1: Basic FastAPI Skeleton with Origin Header Validation
from fastapi import FastAPI, Request, HTTPException
from mcp.server import Server
import uvicorn

app = FastAPI(title="MCP Echo Server", version="0.1.0")
server = Server("mcp-echo")

@app.middleware("http")
async def origin_validation_middleware(request: Request, call_next):
    """
    Middleware to validate Origin header according to MCP specification.
    This prevents DNS rebinding attacks by ensuring requests come from trusted origins.
    """
    # Skip validation for health check endpoint (optional)
    if request.url.path == "/health":
        response = await call_next(request)
        return response

    # Get the Origin header
    origin = request.headers.get("origin")

    # Validate the origin - allow localhost and 127.0.0.1 on any port
    if not origin or (not origin.startswith("http://localhost") and not origin.startswith("http://127.0.0.1")):
        return JSONResponse(
            status_code=403,
            content={"detail": f"Origin '{origin}' is not allowed. Only localhost and 127.0.0.1 are permitted."}
        )

    response = await call_next(request)
    return response

@app.get("/health")
async def health():
    return {"status": "healthy"}

def main():
    uvicorn.run(app, host="0.0.0.0", port=9000)

if __name__ == "__main__":
    main()
Note, since these examples are all run from localhost, we will only check http://localhost and http://127.0.0.1. The MCP spec also says to use 127.0.0.1 if just running on localhost. We will instead bind to 0.0.0.0 because we will eventually be running this in a container and want to run it on the network interfaces.
With this first step, we have the foundation for an HTTP based MCP server that checks origin. Actually, at the moment, it will check origin on anything except /health. When we add the /mcp endpoint, we’ll make sure to verify this origin check. At the moment, let’s run this and test it.
❯ uv run step1
INFO:     Started server process [96328]
INFO:     Waiting for application startup.
INFO:     Application startup complete.
INFO:     Uvicorn running on http://0.0.0.0:9000 (Press CTRL+C to quit)
In another window, let’s run:
❯ curl -s http://localhost:9000/health
{"status":"healthy"}
Great! We have a basic HTTP server. Let’s continue to step 2.
Step 2: Add the basic MCP endpoint
Follow along with the source code for this step.
In step 2, we will add an /mcp endpoint which will serve as the foundation of our MCP server. We will also define what an MPCRequest structure should look like, based on JSON-RPC.
From the MCP spec:
The client MUST use HTTP POST to send JSON-RPC messages to the MCP endpoint.
The client MUST include an Accept header, listing both application/json and text/event-stream as supported content types.
The body of the POST request MUST be a single JSON-RPC request, notification, or response.
Let’s define the structure of an MCPRequest:
class MCPRequest(BaseModel):
    jsonrpc: str = "2.0"
    id: Optional[Union[str, int]] = None
    method: str
    params: Optional[Dict[str, Any]] = None
And let’s update our implementation to expose an /mcp endpoint and also expect MCPRequest(s):
@app.post("/mcp")
async def handle_mcp_request(request: Request):
    body = await request.json()
    mcp_request = MCPRequest(**body)
    if mcp_request.method == "ping":
        return {"jsonrpc": "2.0", "id": mcp_request.id, "result": {}}
    return JSONResponse(status_code=400, content={
        "jsonrpc": "2.0",
        "id": mcp_request.id,
        "error": {"code": -32601, "message": f"Method not found: {mcp_request.method}"}
    })
This basic endpoint accepts a POST at the moment and responds with a canned response. At this point, we should be able to hit this endpoint and validate that origin checking happens:
❯ uv run step2
INFO:     Started server process [96328]
INFO:     Waiting for application startup.
INFO:     Application startup complete.
INFO:     Uvicorn running on http://0.0.0.0:9000 (Press CTRL+C to quit)
In another window, let’s run with the right origin:
❯ curl -s -X POST http://localhost:9000/mcp \
  -H "Content-Type: application/json" \
  -H "Origin: http://localhost:3000" \
  -d '{"jsonrpc": "2.0", "id": 1, "method": "ping"}'

{"jsonrpc":"2.0","id":1,"result":{}}
Let’s try again with a origin that won’t be validated:
❯ curl -s -w "%{http_code}" -X POST http://localhost:9000/mcp \
  -H "Content-Type: application/json" \
  -H "Origin: http://evil.com" \
  -d '{"jsonrpc": "2.0", "id": 4, "method": "ping"}'

{"detail":"Origin 'http://evil.com' is not allowed. Only localhost and 127.0.0.1 are permitted."}403
To run the full suite of tests for step 2, run the following script from the root of the source code (stop the previous run of step2 so ports don’t collide):
❯ ./test_step2.sh
...
...
...
🎉 Step 2 tests completed successfully!
✅ MCP request handling is working
✅ Origin header validation is working
✅ Valid localhost origins are accepted
✅ Valid 127.0.0.1 origins are accepted
✅ Invalid origins are rejected
✅ Missing Origin headers are rejected
✅ HTTPS origins are rejected
✅ Health endpoint bypasses Origin validation
✅ Ping method responds correctly
✅ Error handling for unknown methods works
✅ JSON-RPC 2.0 format is maintained
Step 3: Add tools to our MCP server
Follow along with the source code for this step.
In this step, we’re going to fill in a couple of the MCP messages for listing tools, listing prompts and calling tools. We will create a very simple echo tool and implement this functionality which just returns what was passed wrapped as an EchoRequest
class EchoRequest(BaseModel):
    message: str = Field(..., description="Message to echo")
    repeat_count: int = Field(1, ge=1, le=10)
@server.list_tools()
async def list_tools() -> List[Tool]:
    return [Tool(name="echo", description="Echo a message", inputSchema=EchoRequest.model_json_schema())]

@server.call_tool()
async def call_tool(name: str, arguments: Dict[str, Any]) -> List[TextContent]:
    args = EchoRequest(**arguments)
    return [TextContent(type="text", text=args.message * args.repeat_count)]

@server.list_prompts()
async def list_prompts() -> List[Prompt]:
    return [Prompt(name="echo_prompt", description="Echo prompt", arguments=[
        PromptArgument(name="message", description="Message", required=True)])]

@server.get_prompt()
async def get_prompt(name: str, arguments: Optional[Dict[str, str]]) -> GetPromptResult:
    msg = arguments.get("message", "Hello") if arguments else "Hello"
    return GetPromptResult(messages=[
        PromptMessage(role="user", content=[TextContent(type="text", text=f"Please echo: {msg}")])
    ])
At this point, our /mcp endpoint still doesn’t handle the list or tool call messages, but we should be ready to do that in step 4.
Step 4: Connect Pieces for A Viable HTTP MCP Server
Follow along with the source code for this step.
We have all the pieces to make this a viable HTTP MCP Server (without SSE at the moment). Let’s connect the HTTP POST to /mcp to the tool listing and execution we defined in the previous step:
@app.post("/mcp")
async def handle_mcp_request(request: Request):
    body = await request.json()
    mcp_request = MCPRequest(**body)
    if mcp_request.id is None:
        return JSONResponse(status_code=202, content=None)

    try:
        if mcp_request.method == "initialize":
            result = {
                "protocolVersion": "2025-06-18",
                "capabilities": {"tools": {"listChanged": False}},
                "serverInfo": {"name": "mcp-echo", "version": "0.1.0"}
            }
        elif mcp_request.method == "tools/list":
            tools = await list_tools()
            result = {
                "tools": [tool.model_dump() for tool in tools]
            }
        elif mcp_request.method == "tools/call":
            content = await call_tool(mcp_request.params["name"], mcp_request.params["arguments"])
            result = {
                "content": [item.model_dump() for item in content],
                "isError": False
            }
        else:
            raise ValueError("Unsupported method")

        return JSONResponse(content={"jsonrpc": "2.0", "id": mcp_request.id, "result": result})

    except Exception as e:
        return JSONResponse(
            status_code=500,
            content={"jsonrpc": "2.0", "id": mcp_request.id, "error": {"code": -32603, "message": str(e)}}
        )
We will also implement the HTTP GET to /mcp but not support streamable HTTP at the moment:
@app.get("/mcp")
async def handle_mcp_get(request: Request):
    """Handle GET requests to MCP endpoint."""
    # Return 405 Method Not Allowed as per MCP spec for servers that don't support SSE
    return JSONResponse(
        status_code=405,
        content={"detail": "Method Not Allowed - This server does not support server-initiated streaming"}
    )
At this point we have an HTTP MCP server that satisfies the spec (minus running on 0.0.0.0, but we’re doing that on purpose here to eventually run in a real environment/container environment.).
Let’s test the new MCP server.
From one window, run the following:
❯ uv run step4
For this last step, let’s use the mcp-inspector project which gives a nice UI for connecting to an MCP server. Run the following from your terminal:
❯ npx @modelcontextprotocol/inspector
You should see something like:
Starting MCP inspector...
⚙️ Proxy server listening on 127.0.0.1:6277
🔑 Session token: 8b3c932c5bc76d71a61495d740e2b7749ae44e05e2ccdddce2545e7ebc40be26
Use this token to authenticate requests or set DANGEROUSLY_OMIT_AUTH=true to disable auth

🔗 Open inspector with token pre-filled:
   http://localhost:6274/?MCP_PROXY_AUTH_TOKEN=8b3c932c5bc76d71a61495d740e2b7749ae44e05e2ccdddce2545e7ebc40be26

🔍 MCP Inspector is up and running at http://127.0.0.1:6274 🚀
Copy and past the URL (ie, http://localhost:6274/?MCP_PROXY_AUTH_TOKEN=8b3c932c5bc76d71a61495d740e2b7749ae44e05e2ccdddce2545e7ebc40be26 from above) and go to your browser.

Make sure to use localhost:9000/mcp as your endpoint and chose “Streamable HTTP”. You should be able to then click “Connect” and make a successful connection to your HTTP MCP server.
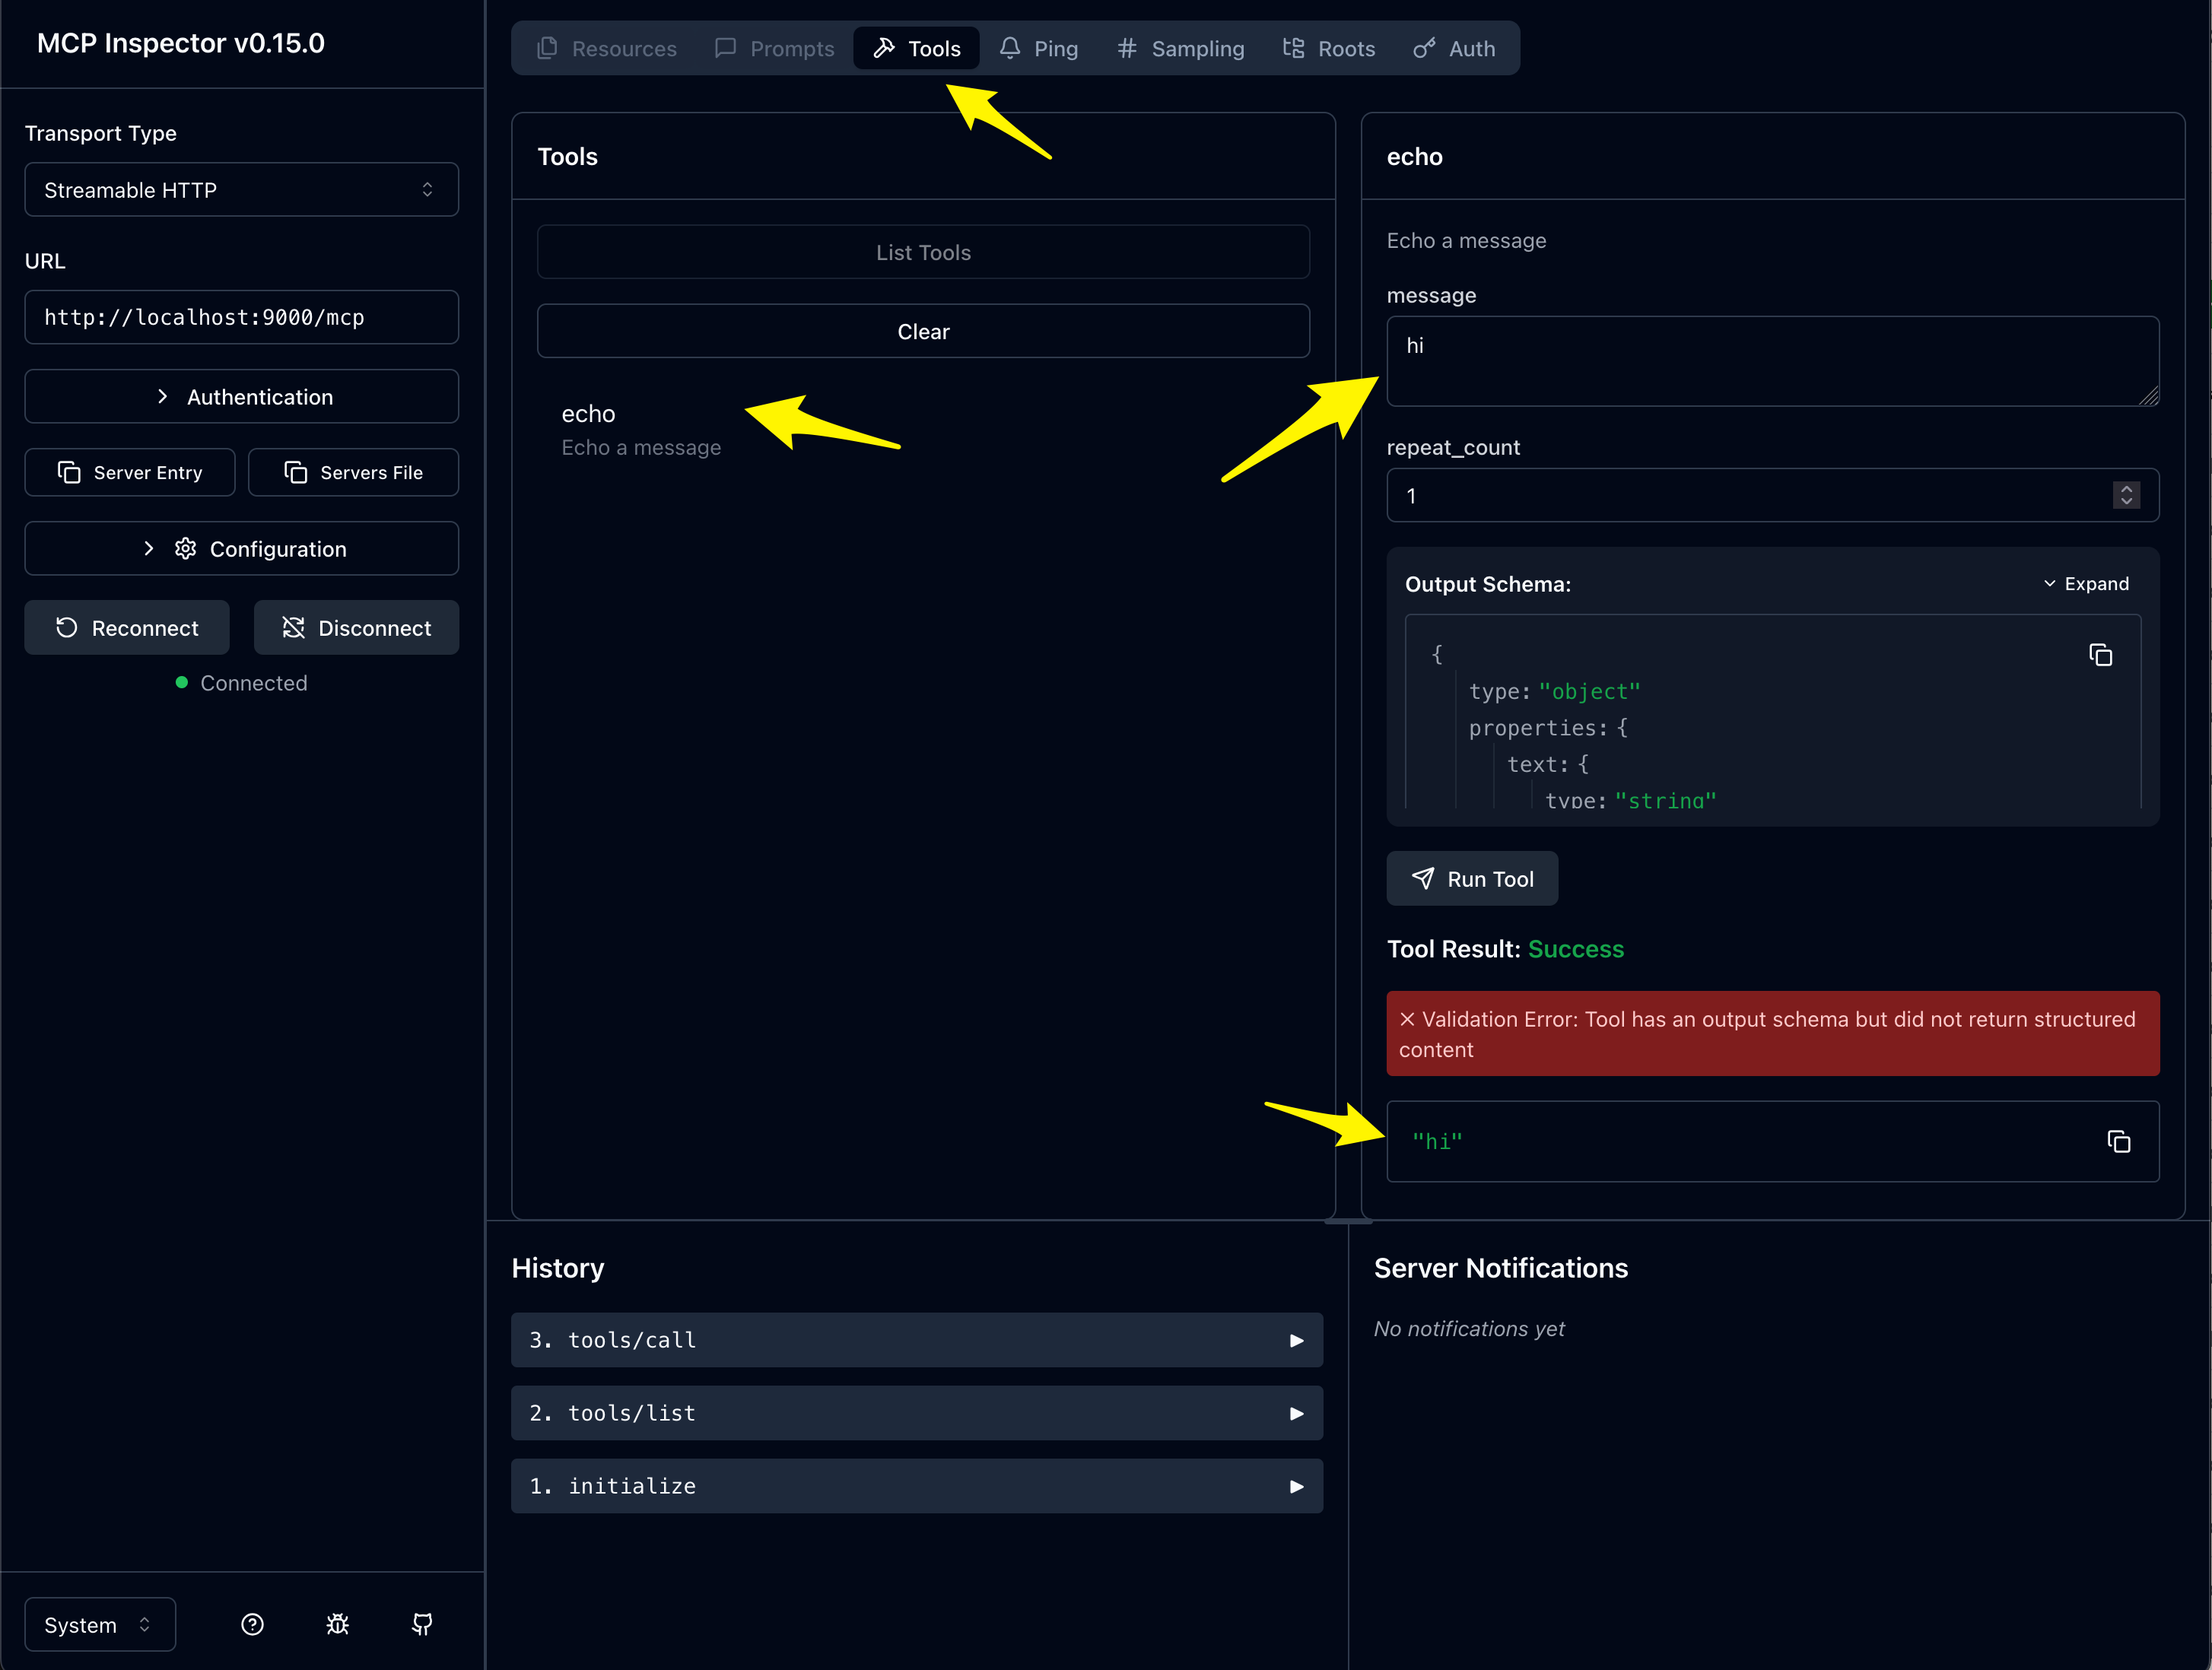
At this point, once connected, you should be able to click on “Tools” -> “List Tools” -> “echo” and then enter a message into the echo tool. You should see a successful response (ignore the message about output schema for now).
Where to go from here?
At this point we have a MCP 6-18-25 compliant HTTP server. This server doesn’t support SSE, sessions, heartbeating, resumability (but these could easily be added) since I want to keep it focused on the Authorization specification. In the next post, we will dig into Authorization “step by step”.