
In the last blog post I introduced Fuse Fabric, an overview of the problems it is intended to solve, and the components that it uses to accomplish pain-free management of large deployments of ActiveMQ and ServiceMix/ESB containers. In this post, I'd like to dive deeper and do more of a tutorial of how to use it. This post could get long, so brave it as time permits. Otherwise, the previous post should be sufficient to get the idea of Fuse Fabric.
Let's review some of the pain points of deploying large integration solutions based on messaging:
- Installation - installing apps, routes, services, containers
- Configuration - configuring apps, network of brokers, master/slave failover, web service endpoints
- Upgrading - new versions of apps, routes, containers
- Introspection - high-level overviews of machine usage, route details, MQ queue/topic stats, etc
Imagine a solution where you have 10+ brokers, ESB containers, or Web Service deployments (more like 100+) and you can see how each of those pain points would really be painful.
Starting Fuse Fabric
As I mentioned in the previous blog post, the recommendation from FuseSource is to use the Fuse Management Console which consists of the Fuse Fabric shell as well as a slick web-based application that uses Fabric under to covers to accomplish the management and configuration goals of Fabric through a much sexier and intuitive point-and-click interface. The Fuse Fabric shell is free, but the web application requires a FuseSource subscription (although you can request a trial trial key, which I recommend). If you are already a subscribing customer, you can start using it right now.
Once you've downloaded Fuse Management Console (henceforth referred as FMC), untar it and navigate to it's root directory. Listing the directory reveals the following contents:
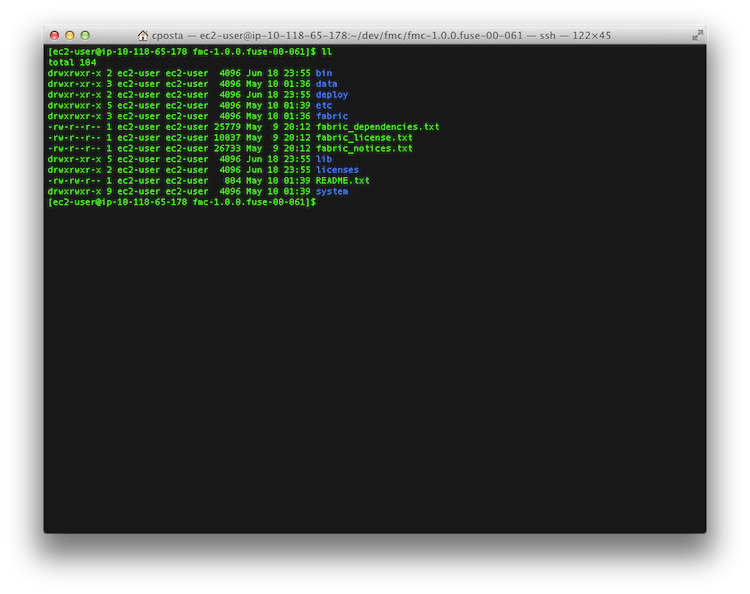
The bin folder contains all of the scripts necessary to start FMC.
- fmc - starts up a local shell allowing you to create a fabric or join an existing one
- fmc-admin - perform basic admin functions (stop, start, create, destroy, change ports) on an instance
- fmc-client - attach a shell to a running FMC container
- fmc-shell - start a simple Karaf shell (no Fabric)
- fmc-start - start the root FMC as a service (no interactive shell)
- fmc-stop - stop the root FMC container
- karaf - core script for running the underlying karaf shell
Other folders of interest:
- etc/ - all of the configuration files for the root container
- data/ - logs, bundle cache, zookeeper files (once registry started)
- instances/ - (once container started) child containers
- fabric/ - profiles and other fabric-related files
- system/ - acts as a local maven repo where bundles will first be retrieved
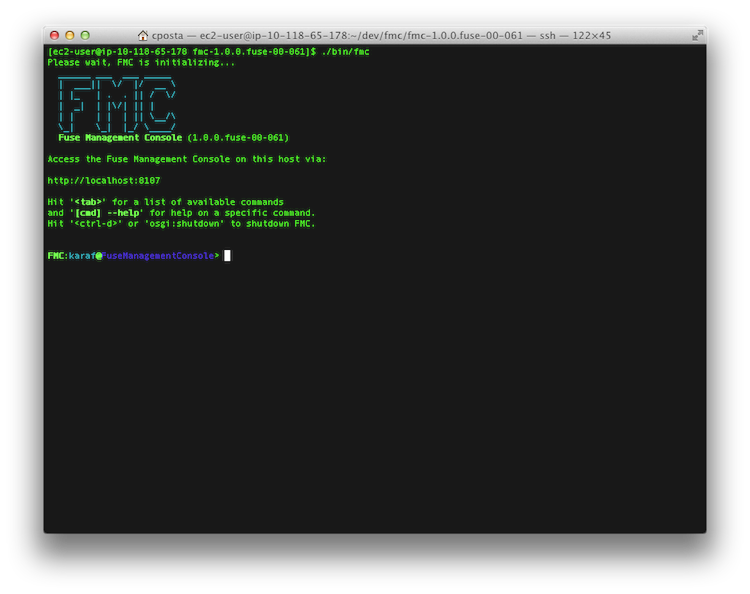
For this tutorial, we'll use the default bin script to start the container and shell:
./bin/fmc
When you run this command, FMC will load all bundles, features, and configuration necessary to bootstrap the root container. Depending on your machine, it could take a while to load up. Once it's ready, you should see the welcome screen. Note the URL that's displayed: http://localhost:8107/ This is the URL to use to connect to the FMC web application.
Fabric Commands
We won't go into detail of all available commands, but this is a Karaf container so most commands available to Karaf should work. Note that there is Tab completion (start typing a few characters and hit Tab to see what commands are available) which is very useful. We will use the fabric sub-shell to accomplish a lot of the steps in this tutorial, so let's see what commands are available:
FMC:karaf@FuseManagementConsole> fabric:<hit Tab here>
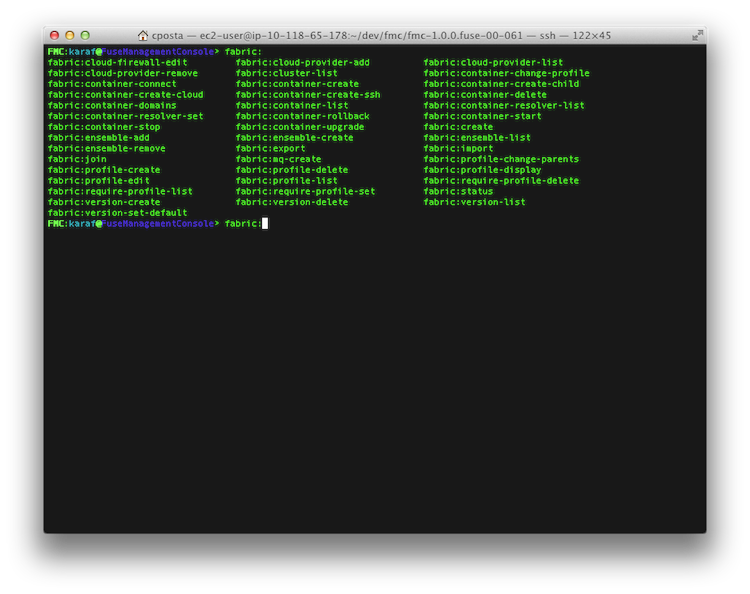
Note some of the commands of interest:
- fabric:create
- fabric:container-create-ssh
- fabric:profile-list
- fabric:mq-create
Just as a helpful pointer, the shell allows you to see documentation for each of the commands by typing --help after a command:
FMC:karaf@FuseManagementConsole> fabric:create --help
Also, there is online documentation for each of the commands.
Since we don't have a fabric registry (haven't created one, nor joined one), none of the fabric commands for creating a container or listing a profile will be available. So we must create a fabric registry. Do so with the following:
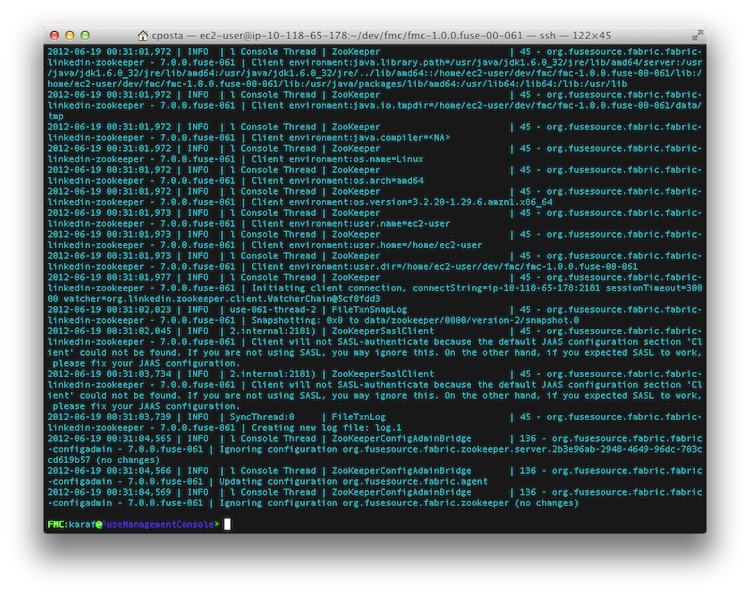
FMC:karaf@FuseManagementConsole> fabric:create
You will not see output after executing this command. It should return to the prompt if executed successfully. To see some kind of detail about what happened, you can check out the log and you'll notice that some Zookeeper threads were created, among a few other things. You shouldn't see any stack traces.
FMC:karaf@FuseManagementConsole> log:display
Now we should be able to see a list of profiles or list of containers:
FMC:karaf@FuseManagementConsole> fabric:profile-list
FMC:karaf@FuseManagementConsole> fabric:container-list
FMC:karaf@FuseManagementConsole> fabric:ensemble-list
Take a moment to see the list of profiles, containers, and containers in the ensemble. The profiles list will show all profiles that ship by default with FMC. The only containers in the container's list and ensemble list should be the FuseManagementConsole container.
Take a moment to explore some of the other Fabric commands and review what they do with the --help command option.
You may be interested to know that some of the commands that start with fabric: have shortcuts allowing you to leave off the fabric: subshell prefix, that is, you can write container-list instead of fabric:container-list. You will notice this for a lot of the fabric commands, and I will point them out when appropriate.
Creating Containers
For this tutorial we'll create containers locally as well as remotely by SSH. If I do a part III of this series, I will show creating containers in the cloud (Amazon EC2 with the jclouds project).
So let's start.
The fabric:container-create command is the general version of the command to create containers either locally, remotely through SSH, or remotely in the cloud. It can be abbreviated by leaving out the fabric: subshell identifier: create-container. I recommend that you use the more specific convenience commands for creating local, ssh, or cloud deployments: container-create-child, container-create-ssh, container-create-cloud to create respective containers. We'll start with local containers:
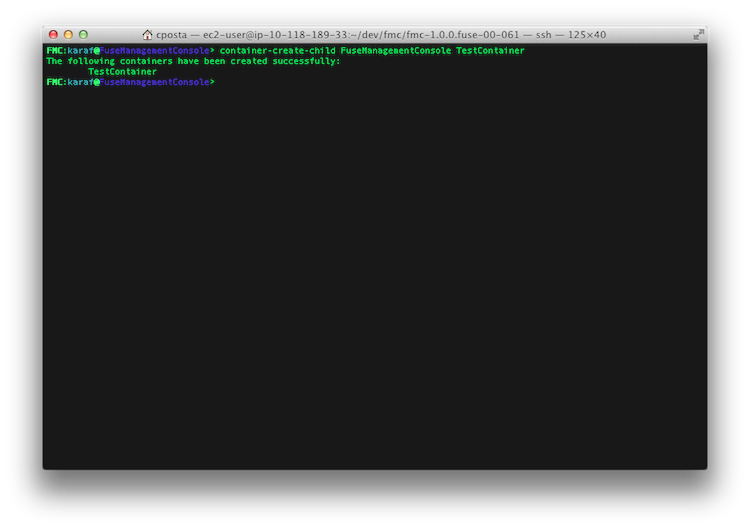
FMC:karaf@FuseManagementConsole> container-create-child FuseManagementConsole TestContainer
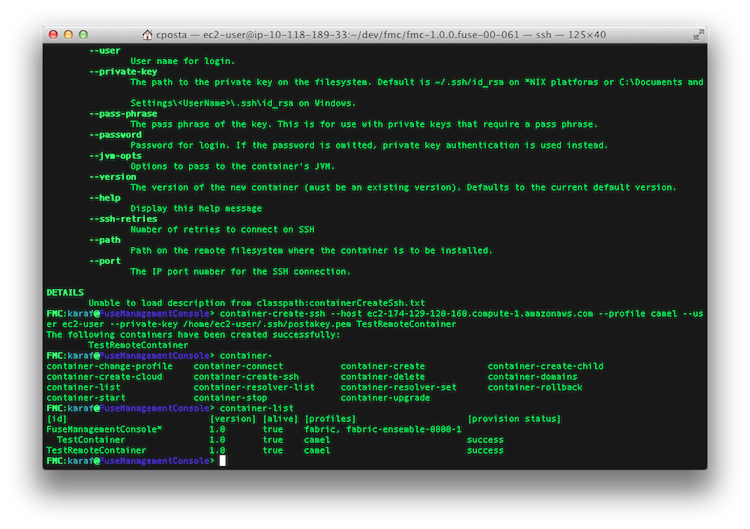
You can make a call to --help for any of the commands you're interested in. In this case, we created a new local container named TestContainer which is a child of the parent FuseManagementConsole. A child container is a local container that is a separate JVM on the same host as the root container. You will find the local containers in the $FMC_HOME/instances folder.
Now when you do a container-list, you should see our TestContainer:
FMC:karaf@FuseManagementConsole> container-list
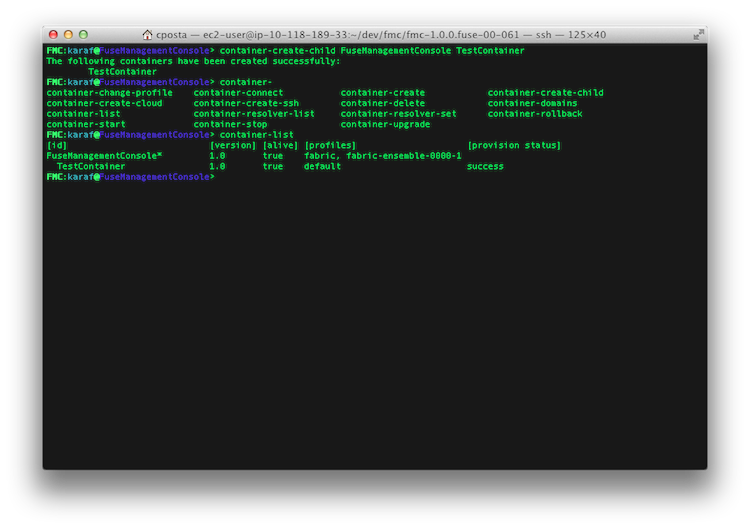
You will see the new container listed, but it doesn't have any profiles! By default, if you don't specify any profiles, the default profile will be applied. We could have applied a profile when we created the container with this command:
FMC:karaf@FuseManagementConsole> container-create-child --profile camel FuseManagementConsole TestContainer
This would have applied the camel profile. To apply multiple profiles, specify the --profile switch multiple times.
But since we didn't do that initially, we can apply a profile with this command:
FMC:karaf@FuseManagementConsole> container-change-profile TestContainer camel
This command replaces all profiles on the specified container (TestContainer) with the specified profile (camel). You can specify multiple profiles by delimiting them with a space:
FMC:karaf@FuseManagementConsole> container-change-profile TestContainer camel mq
You can do the same thing for remote containers. For remote containers (ssh), you'll need to have a username/password or public/private keys set up for authentication. In our example, we'll use public key authentication.
FMC:karaf@FuseManagementConsole> container-create-ssh --host ec2-174-129-120-160.compute-1.amazonaws.com --profile camel --user ec2-user --private-key /home/ec2-user/.ssh/postakey.pem TestRemoteContainer
Exploring Profiles
We saw how to create child and remote containers (will save cloud containers for a next blog entry), but what about profiles? Let's explore profiles a little bit.
FMC:karaf@FuseManagementConsole> profile-list

We used the convenience command profile-list instead of the full-blown fabric:profile-list command, and the profiles that are listed are the ones that ship with FMC by default. Let's take a closer look at the example-camel profile:
FMC:karaf@FuseManagementConsole> profile-display example-camel
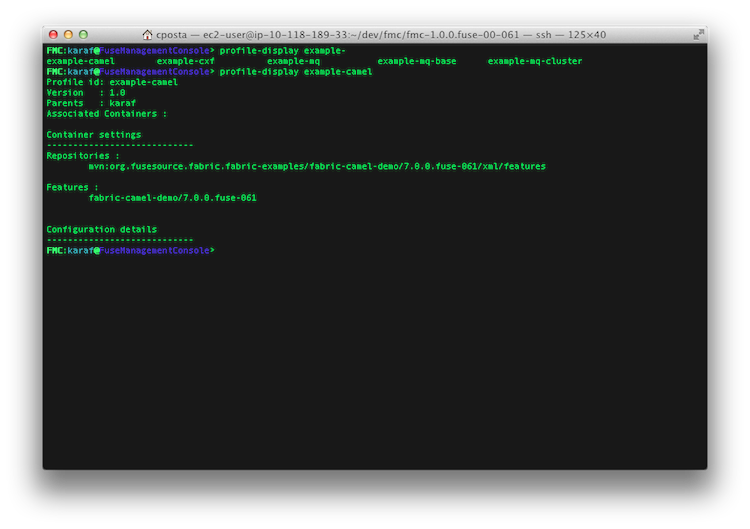
We can see three main things from displaying the profile:
- the parent profile for example-camel is the karaf profile
- a specific repo for Karaf features is listed
- a specific feature is installed
If you remember back to the previous post, profiles apply functionality or configuration to the container. In this case, the functionality that's applied is a camel route defined in the fabric-camel-demo feature.
It just so happens we can take a look at that demo here at github
The camel route for the example is here:
This simple camel route sends a message with the current timestamp to a queue named camel-test. You may want to know to what broker it is sending this message? If you look at the connection factory, the broker URL that's being used is discovery:(fabric:default). Have you seen that before?
Clients can connect to ActiveMQ brokers in the Fabric by using the new discovery protocol. Specifically, the broker URL above says "connect me to a broker in the default group in the Fabric". Mark Brooks has an awesome tutorial for connecting clients to brokers in the Fabric at the Fuse By Example Blog.
Let's get back to the example-camel profile. We saw that it has a feature repo and a specific feature defined. We also saw that it has a parent profile (the karaf profile). Here's a command to overlay the parent profile details with the current profile:
FMC:karaf@FuseManagementConsole> profile-display --overlay example-camel

This shows all features and feature repos associated with the profile including the inherited ones. Let's go ahead and apply the profile to the local container we created earlier:
FMC:karaf@FuseManagementConsole> container-change-profile TestContainer camel example-camel
This will remove any profiles already associated with the TestContainer container and apply the camel and example-camel profiles. Once the new profile is applied, the Fabric Agent on the TestContainer will try to provision all of the required configurations, features, and bundles.
The question becomes now... is that camel route running? The direct answer is yes, it is. But... we don't have any brokers set up, so what is it sending messages to?
Let's set up a broker.
Set up a Message Broker
We can create a broker by applying the mq profile to a container, eg:
FMC:karaf@FuseManagementConsole> container-change-profile TestRemoteContainer mq
However, we're going to use the mq-create fabric command to set up the broker.
FMC:karaf@FuseManagementConsole> mq-create --assign-container TestRemoteContainer mq-test
The mq-create command is specific to configuring brokers. You can assign broker groups for master/slave HA setups, networks of brokers, and specify which store or broker configuration files to use. It's a handy command for administering message brokers. The command above assigned the mq-test profile which is a new profile that is a child of the mq-base profile to the TestRemoteContainer. Use mq-create command to create mq profiles. By default, the broker will be assigned to the "default" group. This will allow the camel route from the example-camel profile to connect to the broker through the discovery:(fabric:default) URL.
To see an example of setting up networks of brokers, see Mark Brooks' blog post on FuseByExample
Updating to a new version
Upgrading to a new version of a profile is just as easy as applying any version. A use case for upgrading profiles could look like this:
You have a camel route deployed in production, but you've made some changes, added some new functionality. Let's say the example-camel profile from earlier (1.0) has some changes and now requires the camel-scala component.
First we want to make a new copy of the profiles and increment the version:
FMC:karaf@FuseManagementConsole> fabric:version-create 1.1
This creates a copy of the 1.0 profiles that are ready to use for 1.1.
FMC:karaf@FuseManagementConsole> fabric:profile-edit --features camel-scala example-camel 1.1
With this command, we edit the profile to include the camel-scala feature. Now let's upgrade the TestContainer:
FMC:karaf@FuseManagementConsole> fabric:container-upgrade 1.1 TestContainer
Recap
The bulk of this post introduced you to FMC, Fabric, and some of its capabilities. We also saw how to install a camel route, how to provision an MQ container, and how to upgrade a profile. Fuse FMC and Fuse Fabric are both very powerful tools to help you manage your enterprise deployments of integration infrastructure. Managing large deployments of ActiveMQ or ServiceMix can be very error prone and difficult even for those well equipped with custom scripts and templates. Take a look at Fuse Fabric/FMC and let me know if you have any questions! I will try to do a part III of this post to show cloud deployments, and show some more demos in depth. Let me know if there's any interest in that.