
I just posted an entry on running HawtIO on JBoss Wildfly 8.1 recently. From that post you know how awesome HawtIO is, and all of the cool plugins it has to make managing your JVM based technologies from a single dashboard... well... hawt....
![]()
However, I wanted to dedicate a post to running HawtIO on JBoss EAP for the same reasons outlined in the previous post:
As we at Red Hat roll out JBoss Fuse and JBoss Fuse Serviceworks, we're getting better at integrating the individual components. For example, a Fuse Service Works subscription gives you full access to A-MQ, Fuse, and all of its components, including HawtIO. Unfortunately, HawtIO isn't "officially" supported in EAP as of today, but that will be fixed in next releases. It's not a limitation of the technology, it's just there's so much there and Red Hat has stringent testing/compatibility requirements so we need to have all of the testing/certification done before we "support it" fully.
BUT... there's really no reason to not use it anyway (at least Development and QA), while we wait for support. And there are lots of people already doing that. Just remember, it's not officially supported yet!
So the rest of this blog is a step-by-step guide with best practices for getting HawtIO deployed and secured on your JBoss EAP 6.x application server. I will use HawtIO 1.4.11 (latest release from the community) for this guide.

HawtIO on JBoss EAP 6.1
This first section will discuss EAP 6.1 because it seems to work great following the similar directions as those for deploying HawtIO on Wildfly 8.1. Basically, if you follow the instructions from the blog post on running on Wildfly, you'll get it working just fine. To be very specific do these pieces:
- Remove the log4j.properties file to use EAP logging subsystem
- Rename distro to hawtio.war
- Create users in ApplicationRealm with roles including "admin"
-
Edit the
standalone.xmlfile to account for the following settings:
I've also added [these instructions to the HawtIO documentation][http://hawt.io/getstarted/index.html] (the website should update with those changes soon).
After successfully deploying HawtIO to JBoss EAP 6.1, you should be greeted with a login page at this URL:
HawtIO on JBoss EAP 6.2
So unfortunately, getting HawtIO to run on JBoss EAP 6.2 has some issues with JAAS that I haven't been able to figure out. If you're a Wildfly 7/EAP 6.x wizard and wish to take a look have a peek at the github issue I have open.
Thankfully, however, HawtIO is quite versatile and doesn't have to be run as a web-app collocated on the container you want to manage. You can run it standalone as a Chrome extension or in a separate container that's not JBoss EAP. Effectively, you can use HawtIO's Connect page to remotely connect to the container you wish to manage.
For example, download the standalone distribution of HawtIO which ends up just being an executable jar. Run it like this (make sure to add the params for the port change, because we don't want to conflict with the EAP ports if running on the same machine):
ceposta@postamachat(standalone) $ java -jar hawtio-app-1.4.11.jar --port 9091
This will bring up HawtIO running standalone (with an internal Jetty server! Woohoo!).
Then click the "Connect" tab and you should see a page like this:
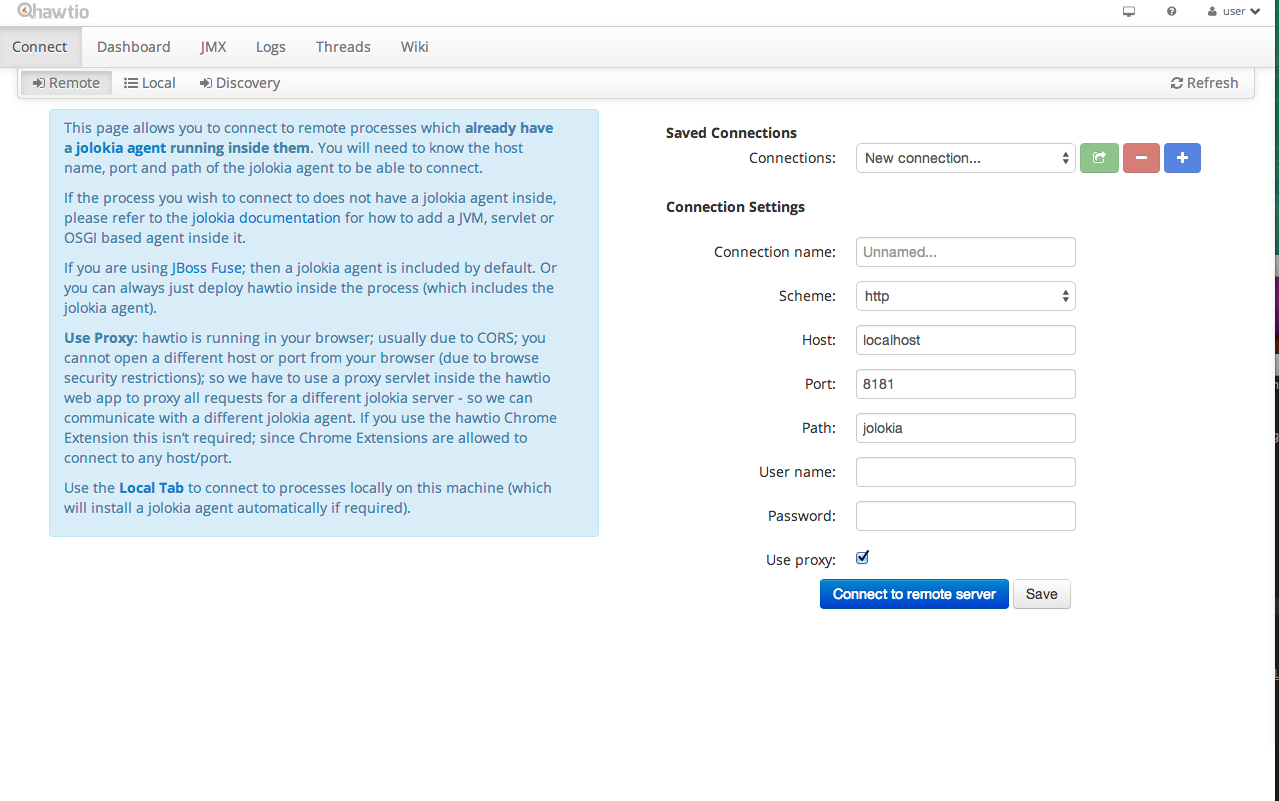
Wait, what? Just connect?
"How would this even work"" you ask? "How can we connect to EAP and have HawtIO just manage it?"
Well, the magic is this totally awesome little library named Jolokia.

Jolokia provides REST access to your JMX tree. So the way to get HawtIO to manage your JBoss EAP 6.2 container is to enable Jolokia on it and then use HawtIO's Connect tab to log in. If you haven't taken a look at Jolokia, you're missing out!! No more complicated JMX API/clients and query/filter API. Just use REST endpoints and curl. Simple.
Jolokia has a few options for deploying/enabling. The most straight forward is a web app, but you could also attach as a JVM agent at startup time. We'll take the easy approach and deploy Jolokia as a webapp:
Rename distro
For this blog post, I'm using Jolokia 1.2.2. So when you download it, it has a name like this jolokia-1.2.2.war. Let's rename the distro so we don't take into account the version numbers to make it easier to get to the URL:
ceposta@postamachat(rename) $ mv jolokia-war-1.2.2.war jolokia.war
Enable security for Jolokia
Next, we want to enable security for the jolokia web app. We'll do that as described in the Jolokia documentation. We'll need to edit the web.xml file that comes in the Jolokia jar and uncomment the section that's blocked out for security:
ceposta@postamachat(rename) $ vi jolokia.war
Your config in WEB-INF/web.xml should have a security section like this:
163   <!--
164   Example Configuration for switching on BASIC security. The role 'Jolokia'
165   must be mapped to real users with passwords on the Appserver side:
166   -->
167   <login-config>
168     <auth-method>BASIC</auth-method>
169     <realm-name>Jolokia</realm-name>
170   </login-config>
171
172   <security-constraint>
173     <web-resource-collection>
174       <web-resource-name>Jolokia-Agent Access</web-resource-name>
175       <url-pattern>/*</url-pattern>
176     </web-resource-collection>
177     <auth-constraint>
178       <role-name>Jolokia</role-name>
179     </auth-constraint>
180   </security-constraint>
181
182   <security-role>
183     <role-name>Jolokia</role-name>
184   </security-role>
185
186 </web-app>
Now add a user like we did in the previous blog that has a role of "Jolokia". Note, make sure this user is added to the ApplicationRealm.
Connect to EAP 6.2
Now go back to your standalone HawtIO (we deployed it in the previous step at http://localhost:9091/hawtio) and enter the connect params (path as follows):
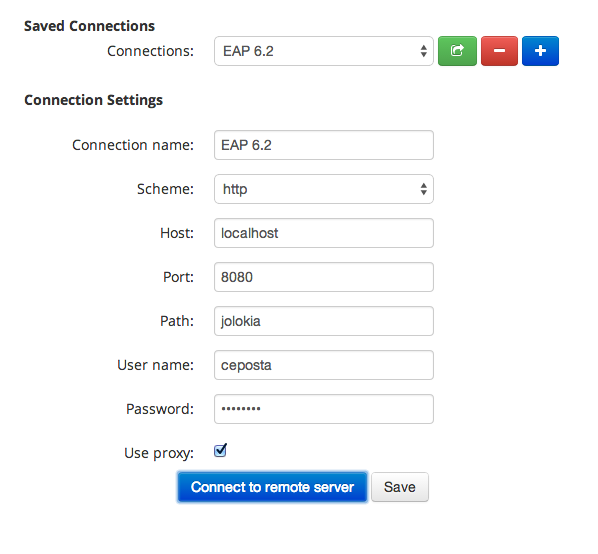
Click "Connect to remote server" and viola! You're conencted.
Where to go from here
You can also try to enable SSL over the http connection as well as maybe use DIGEST auth instead of the default BASIC auth. I'll leave that as an exercise for the reader :)
If you have any questions about HawtIO, please